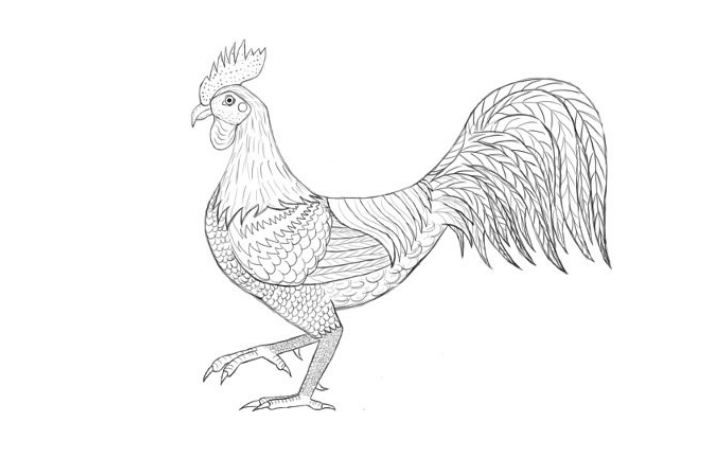
Hello, friends in this post I am showing you How to Draw a Rooster. In this post, I am showing the super way how you can draw a rooster. So it’s very helpful for everyone. Also, you can learn How to Draw a Turkey.
Yes, you guessed it. It is the rooster.
He is the proud defender of this territory, singing his cock-a-doodle-doo from the dunghill with swollen breast.
How To Draw a Rooster Step by Step
Quite an amazing creature! So let’s figure out How to Draw a Rooster.
We keep things very simple throughout this entire lesson.
Although the finished rooster may look complicated, it can be drawn in many small and easy steps.
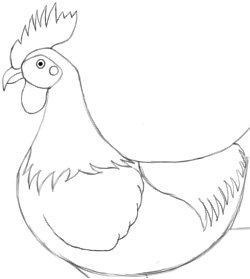
Step 1: Draw a Rooster Outline
We first map out the rooster’s body with simple shapes, before we draw in details.


Now add the neck and head of your rooster to the front end.
The head is an oval. Its length is about a quarter of the semi-circle’s width. The height of the neck and head together should be as large as the height of the semi-circle. This will make for a well-proportioned bird.
Watch out that you don’t place the head too much towards the front.
It shouldn’t reach beyond the front of the breast.
And as you can see, the neck has the breadth of half a semi-circle at the bottom.

Draw a simple shape for the tail in this step.
It starts a bit before the hind end of the semi-circle and curves upwards from there, reaching slightly higher than the head.
Measured from the starting point to the end, the tail is just as broad as the semi-circle. At the bottom, you can cut it off with a straight line.
Step 2: Draw Simple Legs

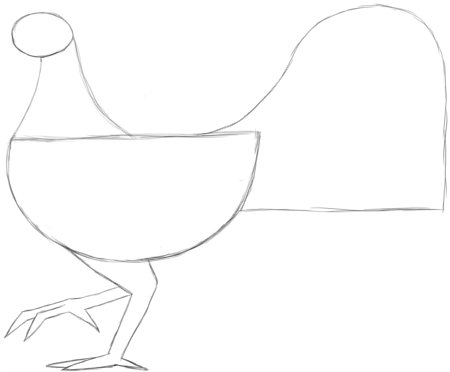
With that, we’ve drawn all body parts of the rooster in a simplified way.
It wasn’t all that difficult, was it?
Now let’s move on to the details.
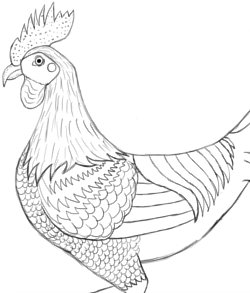
Step 3: Draw Basic Head Shapes
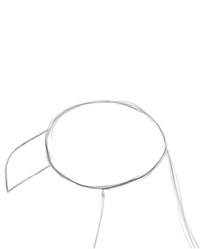

Start by adding a simple shape for the beak.
There is a certain danger to exaggerate its length, so take the oval as a guideline and make the beak a bit shorter than half of the oval’s length.
Add the comb on top of the head. In the front, it slightly overlaps the beak. Don’t add any spikes right now, just take care to draw this basic shape correctly.


Draw in a circle for the eye, so that your rooster can see what’s going on in his barnyard. Place it a bit above the middle and slightly towards the front of the oval.
Draw a black pupil into the eye, and another circle behind the eye on a lower level. This circle is just a white spot in the rooster’s otherwise red face.
Now draw a frame around these two circles, starting from the beak and ending at the beginning of the neck.
Step 4: Draw Head Details

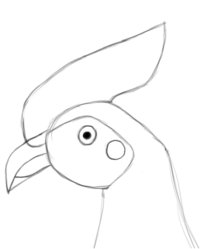
Since a rooster’s head isn’t really an oval, we gonna cut off a little part of its hind end. Draw a straight line from the comb’s end towards the point where the neck meets the oval. Then erase the cut-off oval-part.
Separate the beak into upper and lower parts with a curved line in the middle. Shape the lower beak with a shorter curved line.

Okay, now you can make your rooster proud and give him the insignia of barn-yard royalty: a big, spiky comb crown.
Start with a small spike at the beginning, then let them grow high and higher in the middle, and make a couple of small ones at the end again.
Erase the superfluous line in the comb, and then draw the round wattles hanging below his head.
The rooster’s head is complete, and we move on to give him a nice feather dress.
Step 5: Draw Feathers

First, erase the line separating the neck and semi-circle. Replace it with a curve of curvy spiked shapes.
Now add a bunch of feathers to the hind end as well.
Let it start on the back, just behind the neck, and curve down in an s-shape. Then draw a row of curved zigzag patterns going up to the end of the semi-circle, and reaching beyond it to the tail’s line.
Step 6: The Wing

In this step, you can erase the rest of the semi-circle’s upper line and replace it with a cleaner line for the back, if necessary.
Otherwise, continue right away, and draw in the broad upper part of the wing. On one side it has just a single curved line, and on the other side, it goes up in many little bumps.
Now add the longer feathers to the wing.
Draw lengthy, slightly curved lines that start at the upper wing and reach all the way to the feathers at the hind end.
Step 7: Draw Hind End

Draw lines going up between the single spikes of the back feathers.
Then redraw the rooster’s hind end with a new line that is not at steep as the semi-circle (see red arrow).
Erase the back part of the semi-circle afterward.
Step 8: Draw The Tail

And now it’s time for the big tail feathers!
Draw them in long flowing curves. Start with a few short ones. Then let the others hang down to the straight bottom line.
Don’t let all feathers just bend in one direction. Give some of them a slight s-shape instead.
Now add smaller feathers in the spaces between the first row of feathers. This will make the tail look much denser and filled.
Step 9: Draw Leg and Claw Details

Erase the separation between leg and torso. Also, elongate the backline of the leg a bit into the belly.
Then draw a row of feathers directly above the leg’s joint.


It’s time to replace the simple toe-shapes with more realistic ones.
Make all toes a bit thicker and rounded towards the front, and close them off with a curved semi-circle, out of which the talon will grow.
Then erase the old underlying lines, and add curved talons to the tip of each toe. Also, attach an additional spike to the backside of each leg.
Phew! When you’re still here with me, let me tell you that your rooster is pretty much complete now. You’ve drawn all body parts in detail, and can be proud of yourself. If you feel like taking a break, now is the natural point to do so, because in the next steps we will continue to work over the entire rooster again, adding a texture to the empty white spaces.
When you’re ready for that, let’s move on.
Step 10: Draw Head Textures


Start by drawing a few lines around the eye: one along the top, one along the bottom, and a triangular one at the front.
Then fill the entire comb with many little dots, small circles, and semi-circles.
Add a few very faint and small lines along the top and bottom of the beak. Then draw a bunch of curved lines on the wattle, to make it look as flabby as it is.
I also erased the connection between wattle and head and redrew it with unconnected small wrinkles, but that was perhaps not a smart move. If you think it doesn’t look good, you can leave it as it is.
Step 11: Draw Feather Dress


The rooster’s neck is covered with many little feathers. We can show that by filling it with a lot of short, thin lines. Take care to let their direction flow with the direction of the neck.
Fill the upper part of the rooster’s wing with a few rows of curved zigzag lines, and then fill the rest with connected u-shapes.

Now fill the front part of the body, consisting of the chest and upper leg, with more u-shapes, but make these much smaller than the ones on the wing. Again, take care to let them flow with the direction of each body part.
At the hind end, the feathers become softer and a bit chaotic.
You can quickly fill the space there with more u-shapes but draw these very quickly and sketchy. They don’t have to be as well ordered as in the front. This will create a much softer look.
Step 12: Draw Big Feather Texture


First you draw a single line right through the middle of the entire feather.
Then you add small branches along the side.
Simple enough, right?
But look what a cool effect you get, when you do this for all feathers on the wing, and also all feathers on the tail!
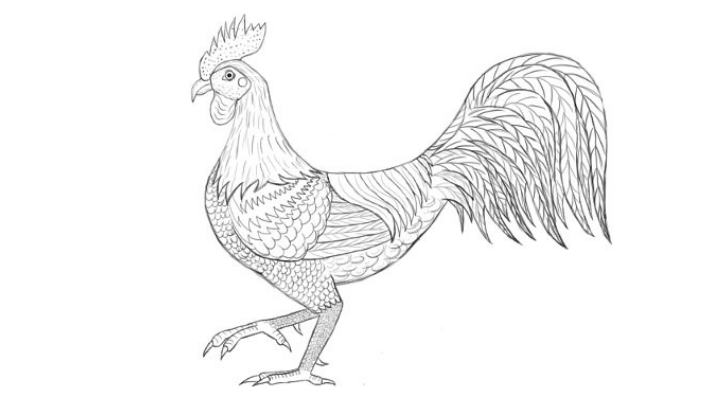
Isn’t he pretty now? When you have done this for all the wing and tail feathers you can also draw a line through the middle of the back feathers.
But don’t add any side-branches here.
How to Draw a Rooster – Leg and Claw Texture
Finally, quickly fill the legs with a lot of small squares and triangles.
Don’t press too hard with your pencil while doing this; otherwise, the texture may look too strong. Then draw curved lines going down from the top of each toe, and your rooster is complete!
After all that work I hope he doesn’t end up in the soup tomorrow!
More Drawing :
How to draw a microscope step by step beginners guide
How to Draw Garfield Easy Step by Step Guides
How to Draw an Arrow 5+ Easy Step by Step Instruction