Hello, Garfield friends.
Let’s draw the fattest and funniest cat in the world together!

How to Draw Garfield – Part 1:
The Head
In the first part of this lesson, we learn how to draw Garfield’s head from two different angles.
In the second part, we learn how to draw Garfield’s body in lying, sitting, and standing positions, starting from a finished head in 3/4 view.
Click on one of these links to start drawing the head:

To jump over to the second part of this lesson and draw Garfield’s body,
How to Draw Garfield – 1.1: Head in Front View
Steps 1 -2 > Eyeshape and Headshape


1. Start with two big ovals that touch each other in a straight line.
These are the eyes, and each of them should be twice as high as it is broad.
2. Now draw a big oval around the eyes. The distance it has from the eyes in different places is important. At the top it almost touches them, at the sides the distance (a) is half the width of an eye, and at the bottom the distance (b) is half the height of an eye.
How to Draw Garfield 1.1 : Steps 3 – 4 > Nose, Mouth, and Eyes


3. Add a round nose between the eyes at their bottom. Draw two small lines going down from it for Garfield’s mouth. Then frame the mouth with two curved lines at the sides.
4. Most of the time, Garfield has a rather bored expression at the beginning of a comic strip. Then something weird happens, and his emotions change. So right now we start with this bored look of his.
Simply divide the eyes a bit below the middle with a horizontal line, and place two semi-circles below it for the pupils. Note that they are closer to the middle line than to the outer edges of the eyes.
How to Draw Garfield 1.1 : Steps 5 – 6 > Ears


5. Now draw Garfield’s ears. They basically just grow out of his eyes at the top. From their lowest point to the tips, their height is the same as half an eye, again (which is also the height of the lower face).
Don’t make the ears too rounded. They are actually rather pointy.
6. Erase the upper line of the head where it is covered by the ears.
Then draw in the ear’s backside. Also add four spikes coming down from the top into each ear.
How to Draw Garfield 1.1 : Step 7 > Stripes

7. Alright, let’s give more stripes to our little tiger.
Draw four rows of stripes evenly spread on each side of his face.
Each one has three stripes that become gradually smaller.
They are all pointing towards the center of Garfield’s head.
Also draw in three little dots on each side of his snout, and three hairs beside the ears.
Wonderful. Now Garfield’s head is finished.
In the next section I show you how to change his emotions with only a few small alterations.
How to Draw Garfield – Emotions

Happiness:
It happens that Garfield is happy. I guess, he ate the last cookie, or brought Jon to despair with some other mischievous prank.
To create this expression, you have to lift the corners of the mouth up beside of the eyes.
Then draw the mouth-lines going up in two long curves from the nose, and place a little fold at their end.
Divide the eyes with upwards sloping lines that meet in the middle. Don’t draw in any pupils, and it will look like Garfield has closed his eyelids out of joy.

Anger:
When he doesn’t get his food in time, Garfield can become quite angry.
You also have to lift the corners of the mouth for this expression.
Additionally, you have to change the shape of the mouth-lines a bit.
Make them a bit pointy towards the bottom, and let them curve down at the corners of the mouth.
Draw the eyelids going down towards the middle, and you get an aggressive look.

Grinning:
When faking innocence, or dancing on the fence, Garfield puts on a huge grin.
The mouth is the same as in the expression of happiness.
You only have to draw the rows of teeth below it.
Leave the eyes wide open, by only drawing in two dots for the pupils.
How to Draw Garfield – 1.2: Head in 3/4 View
Steps 1 – 2 > Eyeshape and Headshape


2. Now draw a big oval around these two. At the top it almost touches the eyes. On the left side the distance to the eye is about as broad as the eye itself. Towards the bottom the distance is roughly half the height of an eye, and along the right side the distance to the eye is very small.
How to Draw Garfield 1.2 : Steps 3 – 4 > Ears


3. Draw the nose as a circle between the eyes at their bottom.
Add two small lines for the mouth below it.
Let two lines curve down from the eyes and build a frame around nose and mouth. Draw the curve on the narrower side of the face much closer to the nose than on the other side.
4. Now add the ears on top of the eyes. They should be half as high as the eyes, and rather pointy towards the top. Don’t make them too rounded. Note that the line of the ear in the back is disappearing behind the other ear.
Draw in Garfield’s lowered eyelids with a horizontal line across the eyes a bit below the middle. Then attach two pupils as semi-circles below it.
How to Draw Garfield 1.2 : Steps 5 – 6 > Ears and Stripes

5. Erase the line of the head where it is covered by the ears.
Draw in the backside of the ears, and watch out that you don’t make it too thick and rounded, again.
If you look closely, you can see that I also added a small line where the front ear is touching the eye.
6. Okey-dokey, the shape of Garfield’s head is complete and now we just have to stripe it.
Draw four rows of stripes along the left side of the head (left from our view). Each row contains four stripes that become smaller and smaller, pointing towards the middle of the head.
On the right side you also have four rows of stripes, but the ones in the middle have only 3 stripes, and the other ones just two.
Also add four spiky-stripes into each ear, and three hairs standing out on each side of the head.
Though we now have a different view on Garfield’s head, his emotions can still be changed in the same way as when seen from the front.
You only have to make everything a bit narrower on the escaping side of the face.
How to Draw Garfield – Part 2: The Body
In this part of the lesson I assume that you already know how to draw Garfield’s head. (If not, first take a look at the upper section, please.)
Now we can focus entirely on his body and draw it in different positions.
I only use the head in 3/4 view here, because it is the one you see in almost all Garfield strips, with few exceptions.
How to Draw Garfield – 2.1: Lying
Step 1 > Hind Body

1. First you draw a small fold for Garfield’s neck behind his head.
It starts at the base of the ear.
Then follow with a big curved shape for the back of his entire body.
It should be as long as the head itself, but only reach down to the level of the eye’s bottom (see red dotted line).
How to Draw Garfield 2.1 : Steps 2 – 4 > Hind Leg and Tail

2. Sketch in a horizontal line from the head’s bottom to the right.
This will now help us to place the hind leg correctly.
The leg consists of two large bulges: an upper one for the knee, and a lower one for the paw. In between them there is a small connecting fold.
Use the red dotted line for orientation.
You can see that the knee is lying entirely above it, and that the paw reaches up to it.
Paw and knee should have about the same size.

3. Now give more details to the paw. Separate it into three toes, and draw a foot-pad behind the last one.
The paw’s shape is actually rather tricky. Take care that its highest point is not at the end where it joins the ankle, but much more in the front.
Towards the ankle it should already curve down again.
Correct that in this step, if necessary.

4. Add the tail in this step.
Make it rather short and thick.
How to Draw Garfield 2.1 : Steps 5 – 7 > Arms and Stripes

5. We can draw in the arms now.
Start with two semi-circles at the sides of the head, and then let a line curve towards the nose from each of them. You can see how close one of the arms comes to the paw and use this as a reference where to place it.

6. Add fingers and another pad to each hand. Keep them all short and very rounded. On one hand you can see three fingers, because it is in the foreground, but on the other one you see only two of them.
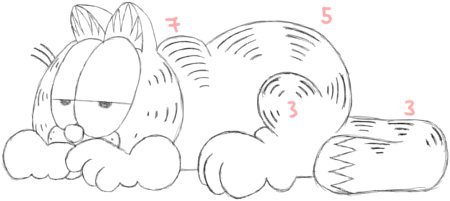
7. Time to do stripes again!
Generally, the stripes become smaller the more you go inside.
On the fold behind the head there are 7 stripes.
On back and knee the stripes are going towards a center point.
There are 3 rows with 5 stripes each on the back,
and 3 rows with 3 stripes on the knee.
The tail also contains a few rows with 3 stripes.
On its tip there is a different kind of stripe, however.
It may look just like a zigzag line, but you can think of it as 5 spikes pointing to the right. Two spikes are seen only in half, because they are touching the side of the tail, and three full spikes are seen in the middle.
Alright, you’re done!
Lazy as he is, Garfield is glad that you drew him in a lying position.
If you don’t mind he’ll take a nap right away now.
How to Draw Garfield – 2.2: Sitting
Step 1 > Torso

1. In the sitting position Garfield’s body has the same height as his head, but it is a bit longer.
Draw a long curve along the front side for the belly. Don’t let it reach beyond the side of the head, though.
Then draw the back with two curved lines: a small one at the top, and a large one below it, going all the way to the ground. This second curve should reach beyond the head at the end.
How to Draw Garfield 2.2 : Steps 2 – 4 > Legs and Tail

2. In this picture I added lines for orientation to help you place the body parts correctly. The horizontal line lies in the middle of the torso, and the vertical line is cutting the head in the middle.
You can also see that the left part of the torso is about half as broad as the right side.
Now you can draw in two bulges for the hind leg: one bulge for the knee, and one for the paw.
The knee lies half above the middle line and half below it, and the paw’s front is touching the vertical line.
Also add Garfield’s tail in this step.
It starts a little bit below the middle line, and also reaches slightly below the bottom of the body.

3. Draw in the front leg and use the red lines for orientation again.
The beginning of the leg is lying above the horizontal line and to the right of the vertical line. At the sides it has two small folds.
The paw reaches to the point where the belly is touching the ground.
Make the front paw only slightly smaller than the hind one.
Then draw in a semi-circle for the paw that is partially hidden on the other side of Garfield’s body.
4. Let me point out here, that the highest point of each paw is not at the end, where the paw meets ankle, but more in the front. Towards the ankle, the upper line for the paw slopes down again already.
Fix that in your drawing, if necessary.
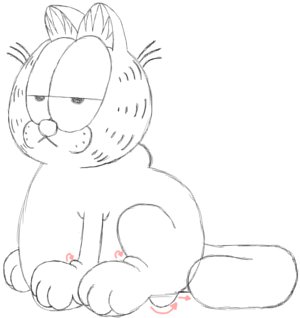
Now you can add the details to each paw.
Separate them into three fingers (two fingers for the partially hidden paw), and add a pad behind those.
Also connect the paws with the legs behind them through little folds (look at the small red arrows).
How to Draw Garfield 2.2 : Steps 5 – 6 > Stripes and Details

5. Okay, this was largely a cleanup step for me.
Here I erased the unnecessary parts of the paws and made the lines of back and belly a bit cleaner.
You can do this too now. Also connect the head to the rest of the body with two small folds (red arrows show it again).

6. And now you’re almost done.
All that’s left to add are the stripes.
All stripes become gradually smaller and appear in rows.
Draw a row of four stripes on the neck-fold.
Then place three rows with four stripes each along the back.
Let them all point towards a center point.
Do the same on the knee, only that the rows have three stripes here.
Place a few rows with three stripes along the tail.
Then separate the tip of the tail with a zigzag line that is forming five spikes, pointing to the right (or four spikes pointing to the left, depending how you look at it).
Congratulations, your Garfield is complete!
Now you better draw a bowl of food in front of him, unless you want him to go nuts right away.
How to Draw Garfield – 2.3: Standing
Step 1 > Torso

1. Garfield’s torso has just the same height as his head, but it is slightly narrower.
You can see the green lines running down from the head’s sides, and that the belly is almost touching the line in the front, while the back has a bit more distance from the line at the hind end.
Draw in the belly as one long curve, and the backside with two curves: a small one at the top, and a long one below it.
How to Draw Garfield 2.3 : Steps 2 – 3 > Sketching the Limbs

2. Yes, his feet are HUGE!
The entire height of legs and feet is one head again (just as large as the torso), and the foot itself is a bit longer than Garfield’s head.
The feet are highest at the front, where they reach up half the way to the torso.
As an orientation where to place the legs, you can look at the red arrow above them. It is pointing exactly to the middle of the torso, and here is the starting point for the hind line of the leg.

3. Now add Garfield’s arm and his tail.
I added a pale, red line in the middle of the torso to show that the entire arm remains on the right side.
Its base is on the height of the upper bulge on the backside, and has two small folds beside it. The arm is very short and ends in a huge hand that is a bit longer than the arm itself (make it at least 50-50).
Let the hand reach slightly over the middle line.
The part of the tail that you see hanging down behind the leg is thinner than the leg itself. However, the thick end of the tail is just as large as the feet at their highest points. Draw a small bulge between the hanging and lying part of the tail to connect them.
How to Draw Garfield 2.3: Steps 4 – 6 > Details and Stripes

4. Separate the hand into three fingers, which are overlapping each other, and the palm.
Also, add two small folds where the head is joining the torso.

5. Now you can erase the unnecessary lines of the hand unless you did so already.
Then it is time to draw more detailed feet.
The front half (without taking the heel into measurement) of the foot contains the toes, while the second half has a single foot-pad.
So separate the front of each foot into three toes, add the pad, and also draw a little fold at the place where the foot transitions into the leg.

6. Alright, there are just a few stripes to add and we’re done!
Draw two stripes on the neck-fold, and three into each row on the back.
One row is partially covered by the hand, however.
There is usually a shadow lying on Garfield’s leg in the background and on his tail.
Draw three more rows with three stripes each below the shadow on the tail. Finally, separate the tail’s tip with five spikes curving towards the left.
Two of them are seen only in half, because they are touching the tail’s side.
And this is it!
Garfield is standing up, which means he is either going to steal food out of the fridge, or he’ll kick Odie down the table.
I’m not sure what I’d love more to watch.
Now that we are aware of how huge his feet actually are, I’m almost feeling sorry for Odie.
Almost.