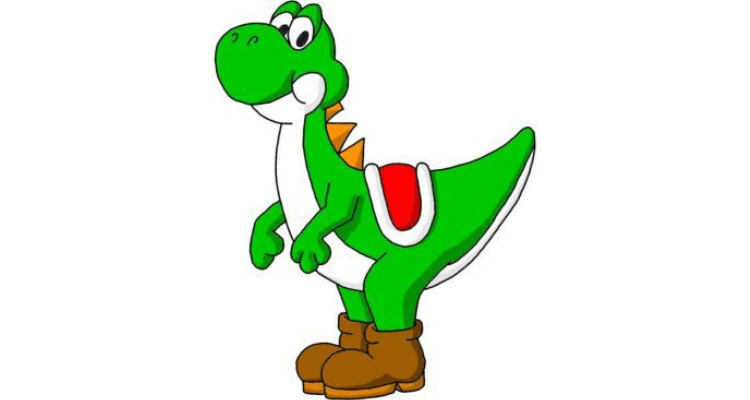
Here you can learn how to draw Yoshi, the dinosaur friend of Super Mario.
I’d love to take a ride on his saddle. That’s certainly more fun than riding a bus. I always wanted to ride on a dinosaur to school, just to see the look on the other student’s faces.
Fantasies aside, here are the steps on how to draw him
1: Head Outline
1. Begin with a circle for Yoshi’s big nose.
2. Sketch in two small ovals for the eyes, sitting to the circle’s upper right. One eye is in the front, and the other one is partially covered by the first one and the nose. Draw both ovals slightly diagonal.
3. Now, outline the rest of Yoshi’s head with three curved lines.
One goes down from the nose towards the throat.
Another one goes down from the eyes. And the third one bulges out for the cheek.
2: Body Outline
4. Yoshi’s body is like a thick, short banana.
Where the body meets the head you can see that the lines don’t transition into each other at the chin.
Draw it in like that, because this lets the headstand out a bit.
5. Draw two lines for Yoshi’s leg growing out of the body’s bottom.
Then add another line for the second leg beside them.
3: Boots
6. Let the legs disappear in something that looks like rings.
This is the beginning of Yoshi’s boots.
7. Add a short line at the boots front side, and a longer line at the back side shaping the frontal boot’s heel.
8. Now draw the boot’s front part. Let them make a big bulge forward, and then draw a rather flat line going back to the heel.
9. Finish the boots by adding the sole.
Make a small separation between heel and front part on the boot in the foreground.
4: Arms & Hands
10. Draw Yoshi’s arm in the front with four straight lines:
two for the upper arm, and two for the lower arm.
The entire arm lies in front of the body.
You can draw the other arm with just two lines because you only see the lower arm sticking out from behind the body.
11. Now add Yoshi’s fingers. They have simple oval shapes that overlap each other slightly. On one hand you see three fingers, and on the other one only two, because this later hand is seen from the side.
5: Head Details
12. Erase a part of Yoshi’s nose, so that there is an open connection between the nose and the rest of the head.
Also draw in two small curls for the nostrils on top of the nose.
13. The bottom of the nose transitions directly into the mouth.
Elongate the bottom line a bit, and then let it end in the middle of a curved shape for Yoshi’s smile.
Add Yoshi’s eyelids by drawing a curved line across the ovals.
14. Add small ovals into the eyes for pupils.
Having done that, draw a line starting from the top of Yoshi’s mouth going down towards the neck. This line will separate Yoshi’s white lower side from his green backside.
6: Body Details
15. Continue where you stopped with the line at the throat, and pull another long line all the way across Yoshi’s body to the end of the tail.
Don’t draw this line across arm or leg, however, but let it dive through below them.
This line is also serving as a separation between the white belly and the greenback.
16. Draw a slightly tilted U on Yoshi’s back for his saddle.
17. Draw a frame for the U and let it stand out above the body a little bit.
18. Now add a curved line that bulges over from one side of the frame to the other. Erase the line of the back where it is covered by the finished saddle afterward.
19. Draw three triangles between saddle and head to give Yoshi a couple of spikes on his back.
20. Now you can carefully redraw Yoshi with a black pen, erase the pencil lines afterward, and color the picture.
Of course, you can also color the pencil drawing right away, just as you like.
Yoshi is ready to go for a ride.
I still wish I had a dinosaur friend to ride on!