How to Draw Mario Characters Easy Step by Step Instructions I started my sketch for this page on a piece of paper that was taped over the top.
I wanted an easy-to-draw version so I would be able to do it more often, but not being much help from other people’s drawings made me want something different and inking wasn’t really close to where I needed is very similar right now!
Requirements :
- Graphite pencils of different grades: HB, B, 2B, 4B, 6B.
- A knead-eraser and a vinyl-eraser.
- Marker Pen and color pen
- Paper
Step by Step Super Mario Characters Drawing Instructions
The best way how to draw Mario is to begin with a simple outline of his body.
Sketch very lightly here, because we’ll erase most of that stuff again.
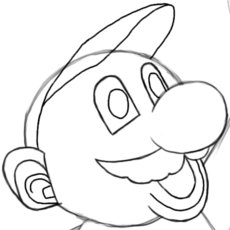
Step 1: Mario’s head Outline

Draw one big circle for Mario’s head.
Step 2: Mario’s body Outline

Then add an oval shape for Mario’s body below it.
It is not much larger than the head. Make them almost equal in size.
Step 3: Mario’s Arms Outline
Now draw in Mario’s arms.
His left arm is raised straight upwards, and the other one is bent downwards. Close off both arms with “rings” and sketch in simple shapes as placeholders for the fists, which we’ll draw later.

Step 3: Mario’s legs Outline
They are both bent at the knee, but one of them is lifted a bit higher than the other one. You can also see that the line of one leg is going a bit into the big oval of his body. That’s because it is in the foreground.
Sketch in the shoes as simple blocks for now, just as you did with the fists.
Step 4: Draw Mario Head Details
The most important part of this drawing is going to be Mario’s head.
We’ll draw it carefully in no less than 10 steps so that we can get all the small details right.

Step 4: Draw Mario nose to the head.
Now add the eyes above the nose. One eye is visible completely, while the other one is partially hidden behind the nose.
Make the first eye a bit broader and the second one a bit thinner, but give them both equal heights, so that they line up at the top.
Then draw in Mario’s famous mustache below the nose.
Again, just one side is visible completely here, while the other one disappears behind the nose.
Sketch in a round shape that reaches out of the circle below the mustache. This is for Mario’s opened mouth. Note that this shape is starting a bit inside of the circle on the left side.


Now erase the circle line inside of mouth and mustache, so that we have clean space there.
Draw a U-shape directly attached to the mustache for the actual mouth-opening.
Also, add an ear to the head’s hind end.
19. Erase the circle line inside of the ear, and then close off the ear with another line. Then draw a frame along the ears upper side.
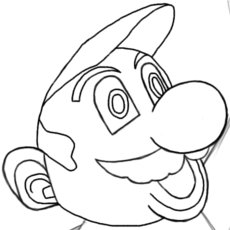
Add an oval into each eye for the iris, and also draw a line around the mouth-opening, so that you get a clearly separated lip.
Step 4: Draw Mario details ear
At the innermost core it has a square shaped opening.
Around it there is a rounded frame, and inside of this frame is one curved line along the top.
Then, starting from behind the ear, draw in the shield of Mario’s cap.
The line first goes up in a slight curve and reaches a bit out of the circle.
It should still be left from the eyes at this point.
Then there is a change in direction and the line goes more towards the right. Make this line so long that it reaches over Mario’s left eye.
Add a curved shape below it that touches the circle above the left eye and ends slightly above the right eye on the other side. From that point you connect it with the line that comes up from the ear.

Since Mario’s face isn’t really a circle we have to make a little correction where the red arrow is pointing to. Let the border of the face run narrow along the side of the eye. If this is already the case in your picture never mind.
Also erase the rest of the circle below the cap’s shield and on the left side.
Then add a smaller oval for the pupil into each iris.
Draw in the eyebrows, and a patch of hair above the ear.
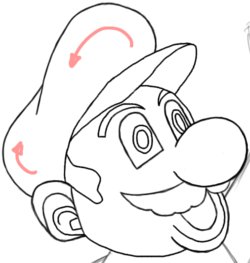

Define the shape of Mario’s cap with two curved lines that meet each other in the middle.
And finally, draw in a circle on the cap’s front and put a big M on it.
Step 5: Draw Mario Clothing


Mario is kinda old fashioned and wearing suspenders. But it looks good on him.
So draw two suspenders going down from beside the head, reaching a bit below the middle of this body.
Place one big button on each suspender’s end, and draw in the upper line of the pants.
Step 6: Draw Mario Fists


Okay, all these arrows below may look confusing, but each single one shows how you have to move your pencil to create the line next to it.
I created these blocks in a previous step, but let’s get a bit more precise with their shapes.
The first one consists of five lines and the second one only of four.
Erase your old blocks, if you have to, and then create the same outlines as you can see here, so that we can draw the detailed fists into them in the next step.
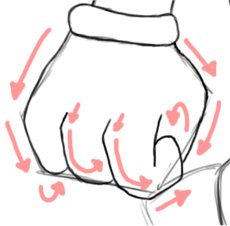
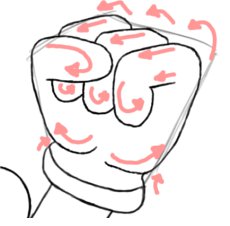
28. Look on each arrow as a guide showing you how to move your pencil to create the line next to it, and then drawing in these fists shouldn’t be a problem. Just tackle one line at a time.
Step 7: Draw Mario Shoes
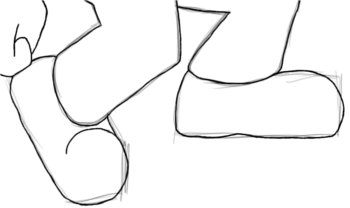
Draw clear lines for the shoes across your initial sketch now.
One shoe is seen directly from the side, and therefore flat, while the other one is seen a bit from above. This second shoe is a bit difficult to get right. The trick is to draw the front as an oval that is opened on one side
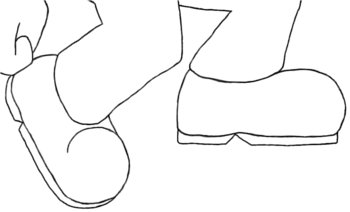
30. Erase all your sketchy lines from before, so that only the clear shoes remain, and then add a sole to their bottom.
Give it a small divide between heel and frontal part

And now Mario is complete, triumphantly jumping into the air.
I wonder how his head is surviving all that knocking against blocks without getting a brain concussion.
His cap must be thickly padded.