In this post, I will show you how to draw an ant in 11+ easy steps. Beginners and kids can also learn ant drawing with the help of this post.
I guarantee this article will make your ant drawing learn easier. All beginner or intermediate artists can easily learn ant drawing with this step-by-step guide. Here I am giving some bonus important tips to improve your ant drawing skills.
This ant drawing post is made for beginners and intermediate artists. So, I tried to make this tutorial as simple as possible. If you are an experienced artist, but you want to learn some insights tips on ant draw. I think this is the right place for you. Because here you can find all the information about ant drawing.
Before starting an ant drawing, it’s necessary to know all details about an ant. Without understanding the ant, we can’t draw a perfect ant. So let’s know some basics outline of an ant.
Basics outline of an ant
Here we will learn all the basic parts of ants. In the picture below, I marked all the parts of the ant for your better understanding.

Ant mainly has three parts. The bigger part is called the gaster. Gaster is the biggest organ of an ant. The next two organs are called the thorax and head. Also, the ant has six-leg and two antennas. So we need to draw this organ outline for ant drawing.
It is very important to understand the ants before starting the drawing. So download some ant images and try to understand the structure of ants by looking at all these images.
You want to learn book drawing : How To Draw a Book
How To Draw an Ant Step By Step
I think you must know that drawing requires some tools or materials. So the first step I have shown my drawing materials in the list below. I use all of these tools for making a “how to draw an ant” tutorial.
Steps 1: Collecting Drawing material
My suggestion try to use all of these tools for better ant drawing. But, you draw an ant only using paper, pencil and rubber.

It’s totally depended on you. Please share with us which paper and pencil you are using?
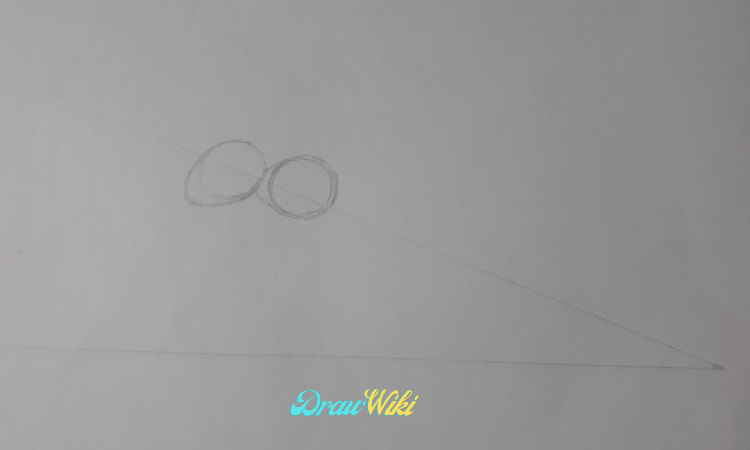
Step 2: Draw Base Line
In this step first, draw a horizontal straight line. Then draw an approx 45-degree straight line. The length of these two lines will depend on the size of your ant.

To draw these lines according to your ants drawing. These two lines should be drawn very lightly with the help of a soft pencil. Because we will erase these two lines in the future.
Step 3: Draw Head Out Line
In this step, I will be shown you how to draw an ant‘s head. To draw the ant head you need to make a circle in a small shape. That circle must be drawn on that inclined straight line.
You can use the compass to make that circle. It will be very good for you. Then I will be drawn an oval line using this circle.
It will be very easy for us to draw an oval line for that circle. But you can draw this oval without drawing a circular line. Remember that any outline has to be drawn lightly. Because we will be easily erased these lines for any mistakes. Because we can easily erase these lines for any mistake without damaging our paper.

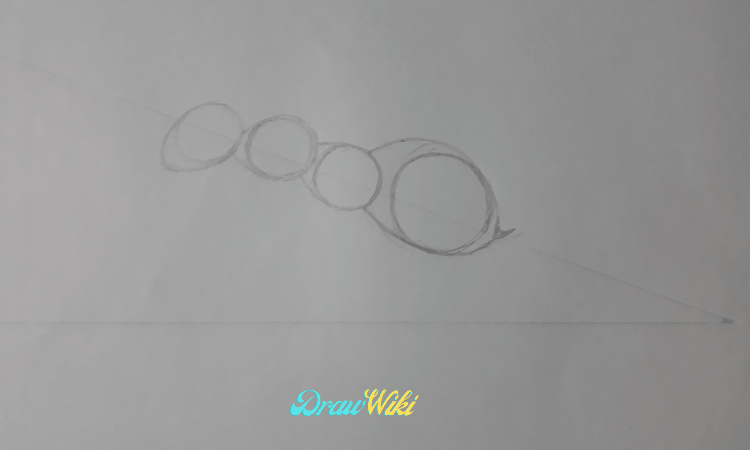
Step 4: Draw The Thorax
In this part, we will draw the part of an ant thorax. Our ant drawing thorax part consists of two oval parts. So we have to draw two oval lines in a row. Following the number-three step, You can also draw these two oval lines.
Since we can’t see the pedicel, so we don’t need to draw a node. So we don’t have to draw that part. You can follow my drawing on how you can draw this thorax organ for knowing that.

Step 5: Draw The Gaster Part
Now, I will draw the gaster organ it’s the last and biggest part of the ant. To draw this figure, we need to draw a relatively large circle. That circle must be drawn above the inclined line and near the horizontal straight line.
Then you have to draw an oval line with respect to that circle. You can follow my drawing on how to draw an ant oval gaster. But you can draw the gaster part slightly different.
Step 6: Draw The Ant Legs
All types of ants have six legs. The three legs are on one side and the other three legs are on the other side. So we have to draw a total of six legs. First, we will be drawn all the baseline to draw our ant legs.

Then we will draw all legs one by one. I am showing how you can draw that all legs of the ant. With the ideas from this drawing, you can draw your own style ant legs.

Steps 7: Draw The Antenna
All ants have two antennae and both antennae are divided into three parts. These three parts called a scape, funiculus, and antenna club. Ant antenna starts from an antennal scrobe.
So guys we have to draw these three parts to draw the ant antenna. First, draw a line from the head and then draw another line from the head. These two lines are the baseline for drawing our ant antennas. We will then draw three parts of the ant antenna based on these two lines.

Now we draw in the first and largest part of the antenna. You draw two lines on both baselines and try to draw similar to my drawing. Now we have drawn the next small parts. Next, draw the antennal club and it’s it the last part of the antenna

Step 8: Draw The Eye
In this step, we’re drawing an ant eye. Draw a small circle. Then draw an oval shape. This oval shape depends on your ant eye size and ant drawing size. Draw the eye size as your requirements.
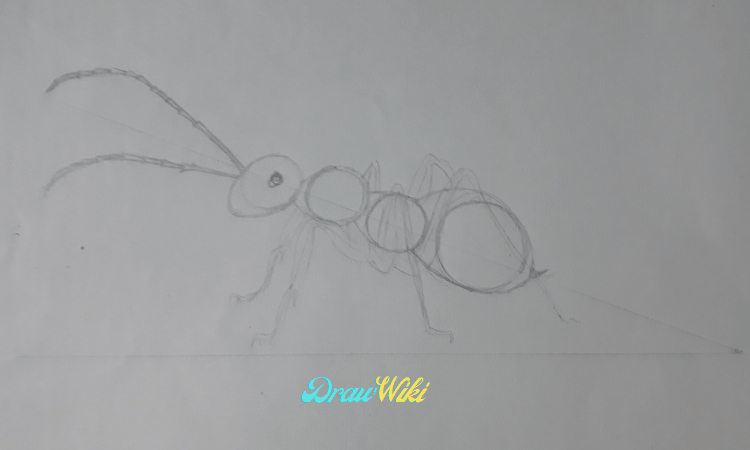
Steps 9: Draw The Ant Mandibles
Now we are drawing The Ant Mandibles. Draw a small triangle on the tip of the ant head. Then use this triangle to draw Mandible details and complete you ant mandible.
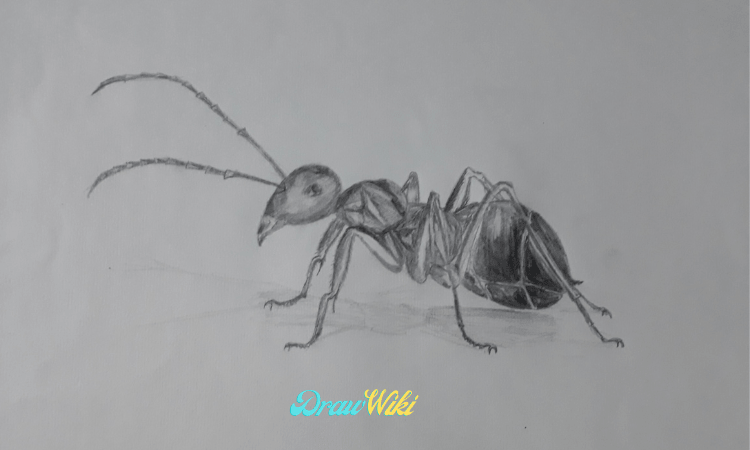
Step 10: Ant Detailing
This is a very crucial step in drawing an ant. Because this step gives your ant drawing a realistic look. Now erase all unnecessary lines from your ant drawing.
Now it’s time to sketch. You can use a 6B or 8B pencil for your dark line sketches and 4B and 2B pencils for the light line sketch. You can use any brand of pencil.
It is very difficult to teach you how to sketch ants. It depends on your sketch’s practice. So try to more for your better sketch. You see my ant drawing image and try to copy.

Step 11: Draw Ant Shadow
Shadow draw of an ant is the last step of “how to draw an ant” tutorials. First, draw gaster shadow then draw thorax and head shadow. Draw this shadow with a 2B pencil.
Last Tips For Better Ant Drawing
Always use good quality paper and pencil if you want good drawing. But you don’t know which paper and pencil are best for drawing. Then I suggested to you, use thick and more structured paper. You can use cartich paper and use an apsara or Camlin brand pencil.
You can use a small piece of paper to protect the paper from all sketching hand dust. It is very important for all drawings.
Conclusion:
If you find “How to draw an ant” article helpful be sure to leave a comment and if we have made a mistake, please let us know. If you like the article, you can share it with your friends and family. Thank you for reading our article.