Who wouldn’t like to fly through the sky with the majesty of an eagle?
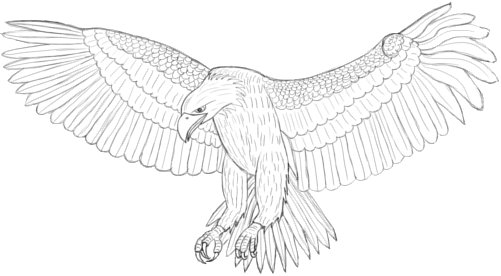
Unfortunately, we can’t do that. But we can make an attempt to capture the majesty of the eagle’s flight in a drawing, which is not quite as much, but still a considerable amount of fun!
Let’s start with a simple sketch of the main body parts.
Step1 : Sketching Head and Torso
Draw with relaxed movements of your hand. Don’t try to control your pencil strokes too much. Instead, draw loosely and freely.

Draw an oval in diagonal position. Make it twice as long as broad.
This oval is the base for the eagle’s head, and we compare all other body parts to its length, which I’ll call “head-length” from now on.
Then sketch in the eagle’s torso. It is roughly as broad as the head-length.
Since we see the eagle from a side angle, the torso is going slightly towards the right at the bottom. The torso’s height is about two and a half head-lengths.
Step2 : Sketching Wings and Legs

Loosely draw in the huge wings with long strokes of your pencil.
Make each wing a bit longer than three head-lengths and give them a pointy end.
Note that there is a little difference it the wing shape.
The upper edge of the eagle’s left wing (right from our point of view) is curving in another direction than the wing on the other side.
This wing’s peak is not lying at the outermost point, but a little bit more inwards. That’s because this wing is lifted into our direction, while the other one is spread away from us.
Now add the two legs below the torso. Their size is about a single head-length.
Step 3 : Adding Claws

A bald eagle needs something to catch fish with, so let’s give him a pair of big claws. First draw a short, featherless “arm” reaching out of the legs, and then add four fingers at its end. Let them overlap each other slightly so that their positioning looks natural.

And since we’re at it, let’s add the talons right away.
Draw a curved, spiky claw growing out of each finger.
The claws on the left foot look a bit shorter, because they are pointing backwards.
Step 4 : Sketching the Tail

As the last body part, we sketch in the tail now.
It basically looks like the quarter of a circle, or a pizza, if you prefer.
At its broadest point it has about two head lengths, and reaches a bit below the claws at the bottom.
Now all body parts are sketched in and we can go ahead to bring out the details.
Step 5 : Head Details

Add the beak to the oval’s front end and a row of bristly feathers to its hind end. You can draw the feathers very easily with simple curved zigzag movements of your pencil.
Watch out that you don’t make the beak too long.
It should be just a little bit longer than half a head length.

It’s time to clean up.
Erase the part of the oval which is lying inside of the beak, and the line along the hind end too, so that the feathers are the head’s end now.
Also clean up the lines along the top and bottom of the head.
Let them slightly bulge in before they reach the feathers.
In this way you subtly separate the actual head from the neck.

Draw a tiny circle on the beak for the nose opening.
Also, give your eagle a piercing eye to perceive the movement of prey below the glittering water surface.
First, draw a long line, then add a semi-circle below it, and place a small black circle into the semi-circle. Leave a tiny white spot inside of the black circle to make it look especially good.
Then draw a line along the edge of the beak’s lower jaw to separate the outer beak from the mouth within.
Step 6 : Wings and Feathers

Make the upper lines of the wings bold and clear now, but erase the lower lines, so that you can hardly see them.
On each wing there is a little bulge, as is pointed out by the arrows.
That’s because there is a joint in the eagle’s bones that becomes visible here.
Make sure again that the lines of both wings are bending in opposite directions at the beginning.

The feathers on an eagle’s wing are arranged in several layers.
There are three layers of small feathers on the upper wing, while the lower section is covered by just one layer of really large feathers.
We start with the layers of small feathers.
Move your pencil as if you are drawing a lot of “U” letters connected to each other, but without ever lifting the pencil. Draw three of these U-lines across each wing, starting at the torso and going towards the arrows from there.
Also separate the lower part of the left wing from the torso through a little gap (another arrow is pointing there).

I counted about eleven special feathers making up the front part of an eagle’s wing.
They are drawn very straight forward. There is just one curved line that goes from the lowest layer of small feathers towards the wings edge, and another mirrored line goes back again. Make the first feathers very pointed, and the others more rounded, the further you progress.

Since we don’t want the bother of drawing in all other feathers individually, we go ahead and close off the wing with another U-line along the bottom.
Don’t try to count all the U’s. The precise amount doesn’t matter. Just give them roughly equal size.

And now it’s easy to finish the rest of the wing.
Simply draw a straight line going up from each peak of the U-line, and you’ve got all big feathers for this wing covered. So let’s hop over to the other side.

Again, we start with eleven special feathers at the wings front.
You can see that I made them rather curved here, in an attempt to create perspective shortening. And indeed, they are a bit shorter than on the other side. Try to create this effect, too. If you don’t, the difference perhaps won’t be very visible anyway.

Now use the same method as before to complete this wing.
First, draw a U-line, and then straight lines going up from all its peaks.
Erase the last parts where the pale bottom line of the wings is visible, if necessary.

Just like on the wing-tips, we add long feathers to the tail now.
Make it twelve feathers in total.
Then erase the rounded edge, so that only the feathers remain.
Step 7 : Details and Texture

An eagle’s feathers are not all smooth, especially not in flight, with the chilling wind tearing at them constantly.
Make the lower side of the legs a bit bristly for that reason, by drawing in spikes along the edges.
Also draw small, thin and curved lines across the claws, to bring out their texture.

All these feather details may look a bit difficult at the first glance, but they are very easy to draw.
Just fill the upper segment of the wings with many little U-lines, until it is are entirely covered. Then draw in a single row of straight lines into the two wing segments below them. Finally, you simply draw a quick line through the middle of each larger feather, and that’s it.
(In the next picture I cut out wings and tail, because they would be very distracting.)

That our mighty eagle doesn’t look like a plucked chicken waiting for the soup, we’ve got to feather the rest of his body.
It’s quickly done, by drawing in small, narrow lines all across him in the direction the arrows dictate. Since they are arranged in a curved fashion, these lines help to bring out the three dimensional shape of the body.
Also draw in a very few lines on the head.
Make them longer, and don’t draw them as dense as the other lines.
That way, the head will still look white, though not naked anymore.
And that was the whole way how to draw an eagle.
Now your eagle is ready to soar high and far, inspiring awe in everyone lifting his eyes to the sky.