This cartoon puppy just fell in love with its own tail.
In a second all you will see is a barking swirl that goes around in circles again and again.
So you better learn how to draw a puppy as long it holds still.
Step 1: Draw Head & Snout
Sketch a big circle for the head.
Be sure to leave enough space around it, so that the whole puppy still fits on your paper.
The puppy is about two and a half circles high and just as broad.
Draw in the shape of the snout.
It sticks out of the lower right part of the circle and consists of two lines.
(I’m always talking about left and right out of your perspective, never out of the puppy’s perspective.<—– left, right —–>)
The left line starts close to the vertical middle axes of the circle.
It first makes a little bulge, then a bigger bulge and finally arcs upwards.
The second line starts a bit higher and very close to the right side of the circle.
At the beginning it is slightly curving inwards, but where it reaches the outer edge of the snout, it changes the direction in a sharp bend.
From there, it is bulged outwards and goes down until it touches the first line.
Now you can add the nose.
It is like a circle with a bent spike that goes out of its bottom.
Also add a curved line at the corner of the mouth.
This will make your cartoon puppy smile.
Draw two lines closely together to outline the mouth.
Start by drawing the outer one, which forks out of the snout at the very corner of the mouth.
Then draw the second line inside of it, with a bit of distance.
Draw one more line for the chin, and you are finished with the whole snout.
The line starts from the left at a rather big distance from the corner of the mouth.
But then it bends much closer to the mouth outline and follows along its shape.
At the very right it arcs up and touches the lip.
Step 2: Draw Eyes
You can sketch in two parallel lines that help you to place the eyes correctly and to give both of them the same size.
Set them so high, that the eyes lie in the middle of the circle’s height.
Since we look at the head from a side angle one eye is only partially visible.
Draw two circles into each eye.
The big one is for the iris and the smaller one for the pupil.
In the right eye their shape is rather oval.
That’s because you look at them from a slight side angle.
All circles are partially covered by the eyelids.
(I filled in the pupils here already, because they look weird when they are empty. But you can wait until you are ready to color everything, if you like.)
You can erase a few unnecessary lines now:
– the line of the circle, where it crosses the snout
– the circle line inside of the nose
The only thing to draw in this step is the little bulge in the shape of the head, just above the right eye (blue arrow).
This makes the shape of the head more realistic.
Step 3: Draw Ears
Now draw in the ears.
The shape that docks the left ear to the head is like a square, but you only see two of its sides (I dotted the other sides to make the square visible).
Out of this square two lines are arcing downwards.
At the middle of the ear they change their direction slightly and join in a rounded shape.
The right ear should have the same height as the left.
Since it is pointing into the background, it appears to be much shorter.
The pale red arrow around it exaggerates the way the line is bulging in and out, to emphasize its shape.
Draw in an additional line into each ear, so that they don’t look flat, but three-dimensional.
The line in the left ear looks like it comes out from the upper right corner of the square, which docks the ear to the head.
In the right ear the line starts out of the bulge above the eye and follows the outline of the ear to the bottom.
Also add another line at the top of the ear shape.
This is a little part of the ears upper side.
Step 4: Draw Fur Pattern
Outline the facial fur pattern with two lines.
They both start at the nose and run up between the eyes, close to each other.
At the top of the forehead they part way in two different directions.
The right one just makes one arc upwards and then goes down to end below the little bulge over the eye, which is still outside of this fur pattern (red arrow).
The left line makes three bulges.
One is above the eye, the other at the corner of the eye, and the last is below the jaw.
How to Draw a Puppy in Cartoon Style – Step 5: Tongue
Draw in the tongue as a long rounded shape that starts thin in the mouth and gets broader at the end.
Add a line that runs along in the middle of its shape.
The tongue is flying to the left, because the puppy is just turning its head quickly to the right.
So the position of the tongue already gives movement to the picture.
Now the head for the puppy is finished.
In the next steps we are going to draw its body.
Step 6: Draw Front Body
Draw another circle below the head.
Make it roughly as big as the first circle.
It should sit slightly more to the left than the head.
I just dotted its upper part, because it would have to be erased anyway.
Connect circle and head with a short straight line (this line is partially covered by drops here already).
Then erase a part of both circles, so that there are no full division lines between head and body any more.
The red arrows mark the new ends of the circle lines.
At the bottom the circle for the head doesn’t go all the way to the jaw any more, but ends shortly after the new neck line.
And the line of the lower circle ends shortly before the tip of the tongue.
You can also erase the part of the circle, which it is covered by the left ear.
Then draw in a couple of drops that fly to the left from the tip of the tongue.
This is strengthening the impression of movement in the picture.
Give your puppy front legs and paws.
The left leg consists of two straight lines that start from the edge of the circle.
Draw an oval shape at their end for the paw.
Take care to make it flat at the bottom.
On its right end, the paw connects smoothly with the line of the leg.
Yet on the left side it goes a bit beyond the line and reaches inside of the leg.
The lines for the right leg don’t start from the edge of the circle but inside of it. On the left, the line starts from a lower point and is very short. It ends even before it leaves the circle.
On the right, the line side starts from a higher point and is much longer. It reaches out of the circle and makes a curve there to form an elbow.
Draw the paw as an oval.
It isn’t flat anywhere because the puppy is lifting it and you are looking at it from above.
From the top of the paw a short line reaches into the middle of the arm.
Step 7: Draw Hind Body
Draw another circle with the same size as the circle for the front body.
It should also lie on the same height as the first circle, but you should leave a little bit of space between them.
Now you can add the hind legs.
They both actually have the same form.
The only difference is that one leg stands firmly on the ground, while the other one is lifted a bit backwards.
Both grow directly out of the circle’s edge.
The left leg just has two additional lines at its top (purple arrows).
Of these, the first one is very short and lies on the circle itself.
The second is much longer and reaches a good deal into the circle.
Step 8: Draw Toes & Tail
Connect the hind body and the front body with two short lines.
The first starts from the upper left side of the hind circle and disappears under the snout.
The second starts from the top of the left hind leg, and touches the right arm a bit above the elbow.
Then separate the toes on each paw with curved lines.
Draw two of them into the front paws, but only one into each hind paw, because you see the hind paws from the side only.
Finally, draw in the tail.
Its base is a circle that sits at the upper right edge of the hind body.
Out of the circle two long lines are bending upwards until they meet at eyelevel.
The upper line starts inside of the circle, while the lower one starts from the circle’s bottom.
Step 9: Draw Cleaning Up
The shape of your cartoon puppy is actually finished now.
This is just an erasing step.
The red arrows mark the ends of the circle lines, where I erased a part of them.
Also erase the part of the circle, which runs through the lifted front leg, and the parts of the hind circle which are covered by the hind legs.
Step 10: Draw Fur Pattern
You can give your puppy’s body a nice fur pattern.
Draw in any fur pattern you like.
If you want to, you can turn your puppy into a Dalmatian and give it thousands of little dots.
My picture and advice below is just a suggestion.
I was inspired by a Beagle.
If you want to draw the same fur pattern like me, separate the fur with very curvy lines.
There is a short line at the tip of the tongue, which separates the head from the body.
A much longer line separates the front body from the hind body.
And there is a line at the top of each hind leg, and one in the middle of the tail.
As you can see, there is still plenty of room on the front body and the legs for additional specks.
So feel free to add as much as you like.
Step 11: Draw Movement
Let’s use a simple cartoon technique to bring action and movement into the picture:
When you draw a few short lines at the side of an object, this indicates that it is moving.
I visualized the direction of movement with purple arrows.
The movement-lines are always on the opposite site of the movement direction:
1. The puppy is just turning its head to the right. Therefore the lines are at the left side of the head.
2. This turning of the head makes the ears fly upwards a bit.
So the movement-lines are below the ears.
3. Since the puppy is lifting its front leg and moves it to the right, the movement-lines are at the lower left of the lifted paw.
4. The tail is wiggling slightly to the left and to the right. Since it is moving in both directions, you have to draw lines at both sides of its peak.
Now you have much more energy in the picture.
It doesn’t look like your cartoon puppy is a statue, but a living and moving creature.
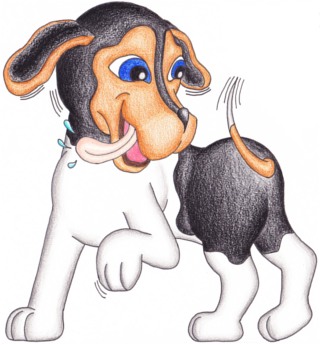
Step 12: Add Inking & Coloring
To get clear, black cartoon lines, you can now use a thin marker or some sort of inking pen to redraw the pencil lines.
Do it slowly and with care, because if you go off track, you can’t erase these black lines any more.
Erase all pencil lines when you are done.
Then you can color your puppy to your liking.
Since mine is a Beagle I made it black, white and brown, but let your imagination run wild.
You can even make it a green alien puppy if you think that’s fancy.
(I recommend giving it antennas in that case.)
All I can say now is “Yelp, Yelp”!
Congratulations for taking the time to learn how to draw a puppy.
I’m sure your new baby dog is proud of its owner and vice versa.